Firebase Facebook Login in Swift – Tutorial
With the release of Swift 5 approaching and Firebase Firestore finally getting out of beta, let's take a look at how the Firebase Facebook Login is implemented in Swift. All of our Swift app templates have Facebook support since it's a widely demanded feature, so let's see how we implemented it.
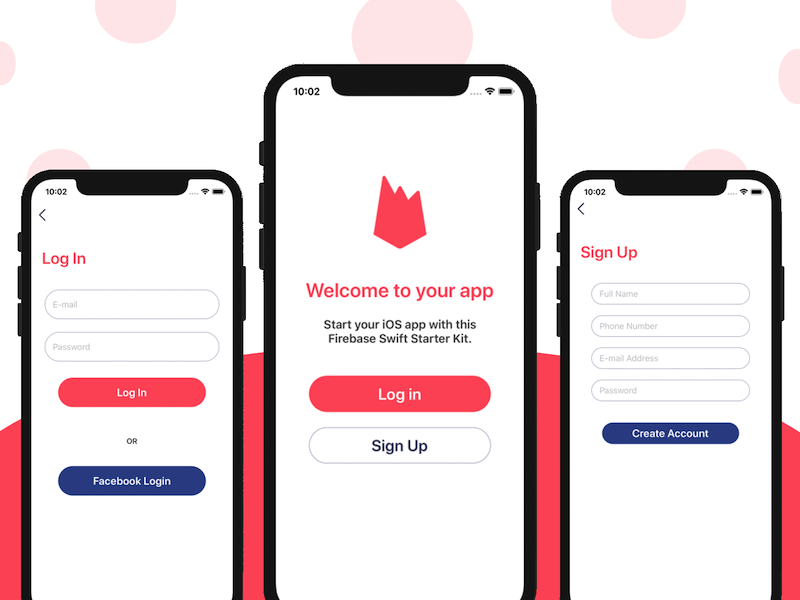
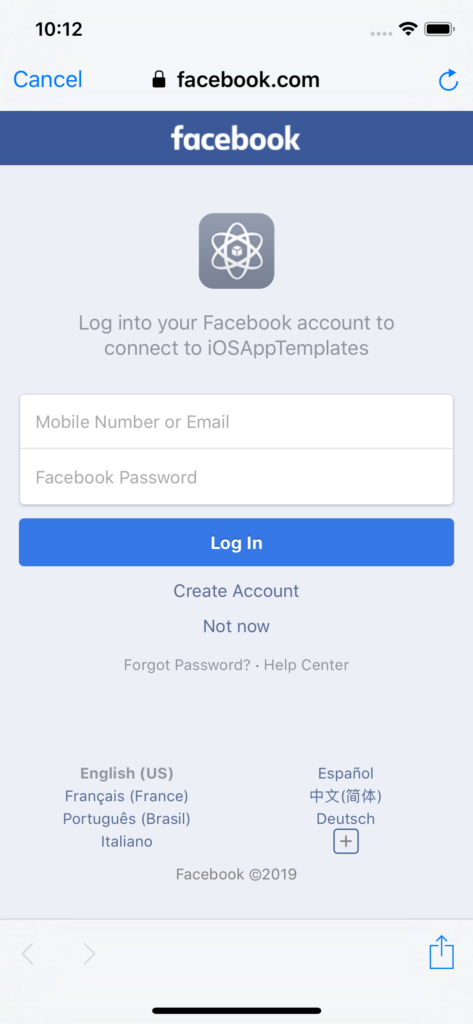
This tutorial will help you learn how to add a Facebook Login button into your own app and how to integrate it via Firebase Auth. Needless to say, this iOS guide is using Swift. Let's see how a Swift programmer can leverage Firebase Authentication to implement Facebook login and registration. Here's what we are going to end up creating:
If you’re a pro already, you can directly download our free Swift Starter Kit, which contains the Facebook Login integration described in this tutorial.
1. Download this Swift Starter Kit to get started with the tutorial
Unzip the archive, install the pods and run the sample Swift app in Xcode. Play around with it and notice how the classic login with e-mail and password already works. Check out the Podfile and observe the already added Firebase dependencies. Take a look at the code, especially at FirebaseAuthManager class, which is where most of the magic happens.
As you can see, there’s already a Facebook button on the login screen, which is currently doing nothing when tapped. In this iOS tutorial, we are going to add the full functionality on this button. Let’s see how.
Mega Bundle Sale is ON! Get ALL of our iOS App codebases at 90% OFF discount 🔥
Get the Mega Bundle2. Create a New Facebook App
In order to add Facebook Login functionality to your app, you need to create a new Facebook app. The way Facebook login works is that your Facebook app asks for permissions from users (personal data, friends, etc), and then it retrieves all that information if the users granted those permissions.
So, head over to Facebook Developers Portal and create a new iOS app (in the top right corner select My Apps -> Add a New App). Type in the desired display name (this will be shown to users) and then complete the steps. For selecting a scenario, pick “Integrate Facebook Login“. Once your app gets created, it’ll land you on a Facebook dashboard.
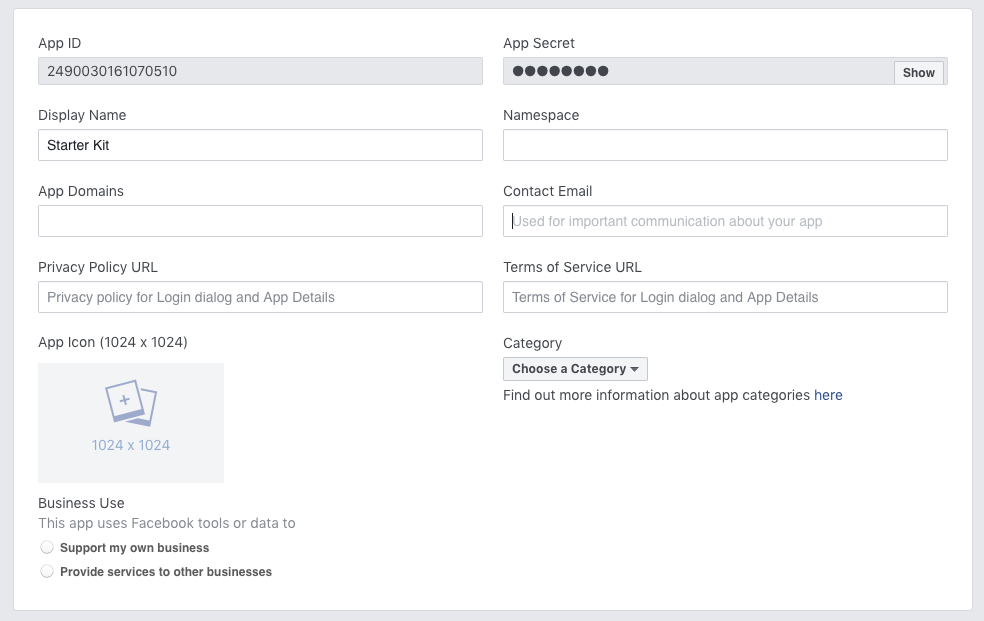
Notice the App ID and App Secret. We’re going to use those below.
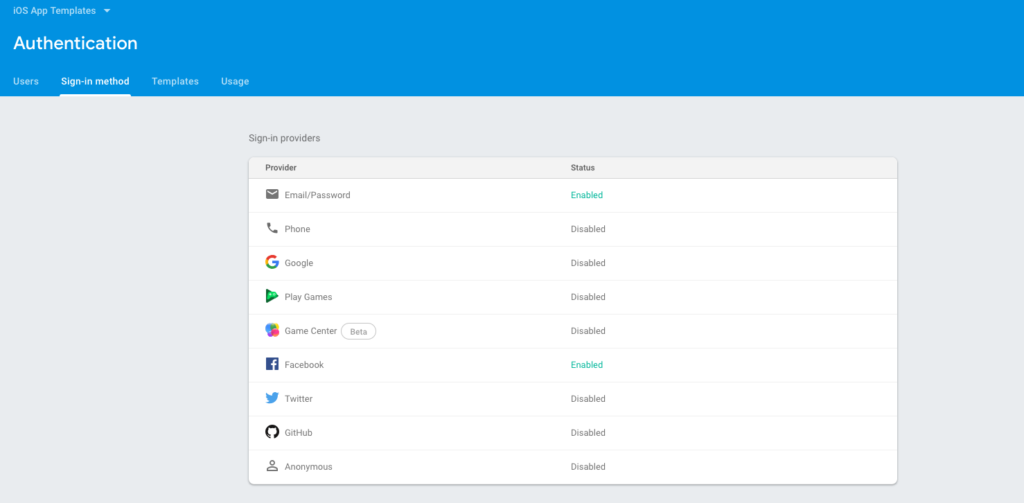
3. Enable Facebook Sign-in in Firebase Console
Assuming you’ve already completed our Firebase Swift tutorial, you are already familiar with the Firebase console and how you can add Firebase into your Xcode project. To enable Facebook Login, go to Firebase Console -> Authentication -> Sign-in method and enable Facebook.
When prompted for the Facebook information, get the app ID and App Secret from the previous step.
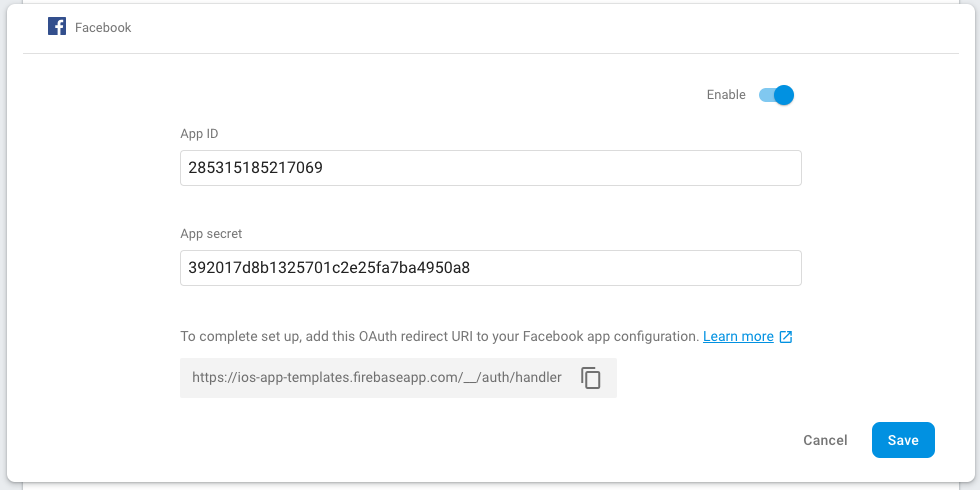
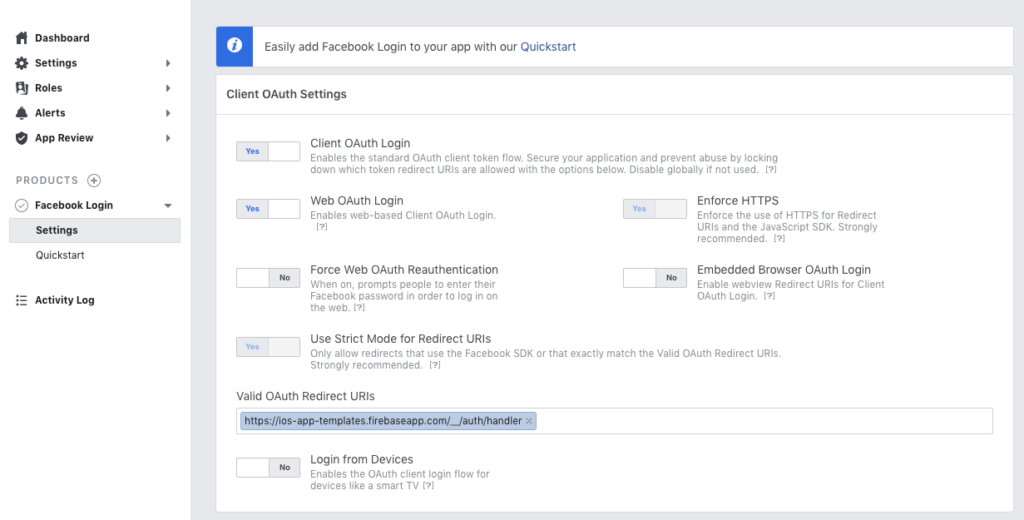
Copy the OAuth Redirect URI to your clipboard and paste it in your Facebook Dashboard (Facebook Developers Portal -> Your App -> Facebook Login -> Settings), in the Valid OAuth Redirect URIs field.
Mega Bundle Sale is ON! Get ALL of our iOS App codebases at 90% OFF discount 🔥
Get the Mega Bundle4. Configure your iOS app Settings in Facebook Developers Portal
To finally enable iOS Facebook Login, head over back to Facebook Developers -> Facebook Login -> Quick Start -> Choose iOS and complete steps 2, 3 and 4. Do not do step 1!
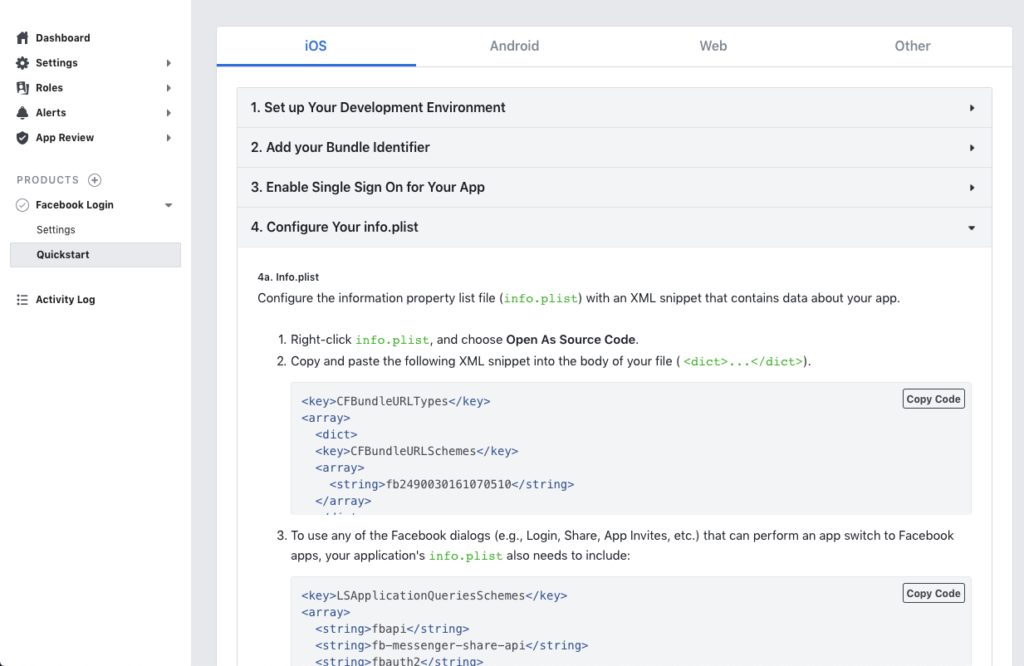
For step 4, go to Xcode, right-click on the Info.plist file -> Open as Source Code and add the code suggested by Facebook into the main <dict> section:
<key>CFBundleURLTypes</key>
<array>
    <dict>
        <key>CFBundleURLSchemes</key>
        <array>
            <string>fb285315185217069</string>
        </array>
    </dict>
</array>
<key>FacebookAppID</key>
<string>285315185217069</string>
<key>FacebookDisplayName</key>
<string>iOSAppTemplates</string>

<key>LSApplicationQueriesSchemes</key>
<array>
    <string>fbapi</string>
    <string>fb-messenger-share-api</string>
    <string>fbauth2</string>
    <string>fbshareextension</string>
</array>
5. Add Facebook iOS SDK dependencies
On a high-level, to add Facebook Login via Firebase Auth in an iOS app, we need to implement three major components:
-
Add Firebase & Facebook SDKs to the app -The easiest way to interact with Firebase backend and Facebook servers is to use their iOS SDKs, which are frameworks Google and Facebook already built for Swift developers.
-
Call the Firebase SDK code for all the authentication operations. The Firebase SDK takes care of Facebook login on its own. We only import the Facebook SDK in order to get extra information from Facebook, such as profile photo, friends, etc. But the authentication mechanism is fully handled by Firebase.
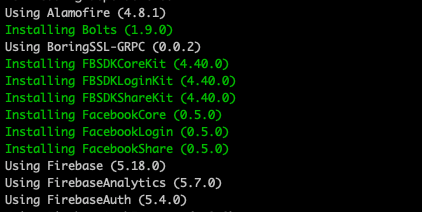
As a first step, let’s add the Facebook pods into our Podfile since Firebase is already there. Open Podfile and add the three Cocoapods dependencies:
# Pods for FirebaseStarterApp
pod 'FacebookCore'
pod 'FacebookLogin'
pod 'FacebookShare'
Now run again "pod install" to install the newly added pods.
6. Write the Firebase Facebook Login Swift code
If everything went smoothly with the setup, you’re now able to call the SDK code and actually implement the functionality of the Facebook button. Let’s first add a method to FirebaseAuthManager class:
func login(credential: AuthCredential, completionBlock: @escaping (_ success: Bool) -> Void) {
    Auth.auth().signIn(with: credential, completion: { (firebaseUser, error) in
        print(firebaseUser)
        completionBlock(error == nil)
    })
}
Mega Bundle Sale is ON! Get ALL of our iOS App codebases at 90% OFF discount 🔥
Get the Mega BundleIn this method, we call Firebase’s auth functionality, taking in a credential object. This auth credential object can be obtained using the Facebook SDK. Let’s go to ATCClassicLoginScreenViewController and import the following frameworks:
import FacebookCore
import FacebookLogin
import FirebaseAuth
Let’s now specify the permissions we want to request from our Facebook users in an immutable array:
private let readPermissions: [ReadPermission] = [ .publicProfile, .email, .userFriends, .custom("user_posts") ]
In this instance, we are requesting permissions for the public profile, e-mail, user friends and user posts. If you don’t need all these permissions, remove whatever is not necessary.
Now that all the setup is in place, let’s see how we add the Facebook Login functionality to the existing UIButton:
@objc func didTapFacebookButton() {
    let loginManager = LoginManager()
    loginManager.logIn(readPermissions: readPermissions, viewController: self, completion: didReceiveFacebookLoginResult)
}
private func didReceiveFacebookLoginResult(loginResult: LoginResult) {
    switch loginResult {
    case .success:
        didLoginWithFacebook()
    case .failed(_): break
    default: break
    }
}
fileprivate func didLoginWithFacebook() {
    // Successful log in with Facebook
    if let accessToken = AccessToken.current {
        // If Firebase enabled, we log the user into Firebase
        FirebaseAuthManager().login(credential: FacebookAuthProvider.credential(withAccessToken: accessToken.authenticationToken)) {[weak self] (success) in
            guard let `self` = self else { return }
            var message: String = ""
            if (success) {
                message = "User was sucessfully logged in."
            } else {
                message = "There was an error."
            }
            let alertController = UIAlertController(title: nil, message: message, preferredStyle: .alert)
            alertController.addAction(UIAlertAction(title: "OK", style: .cancel, handler: nil))
            self.display(alertController: alertController)
        }
    }
}
That’s it. As you can see, we are calling the LoginManager (part of Facebook SDK) to receive a credential object, by specifying what permissions we need, which we subsequently send out to the Firebase Auth component.
Run your app and try out the Facebook login. You should get the following behavior:

Looking for a custom mobile application?
Our team of expert mobile developers can help you build a custom mobile app that meets your specific needs.
Get in TouchThat’s all for now. Check out the Firebase Auth console to see if the user you’ve just logged in with shows up there. If you want to see all the data that’s available from Facebook, tweak around the current code and inspect the firebase user object. Right now, we are only sending back to the view controller a simple success flag, but you definitely can modify the existing code to use the actual Facebook data.
Note: The code works for both login and registration with Facebook. If the user didn’t exist in the database, it just gets created.
You can find the Git diff commit with all the code changes here.
Hope you enjoyed this Swift tutorial on how to add Firebase Facebook Login in Swift using Xcode. Happy coding!