Firebase Swift Tutorial: Login and User Registration on iOS
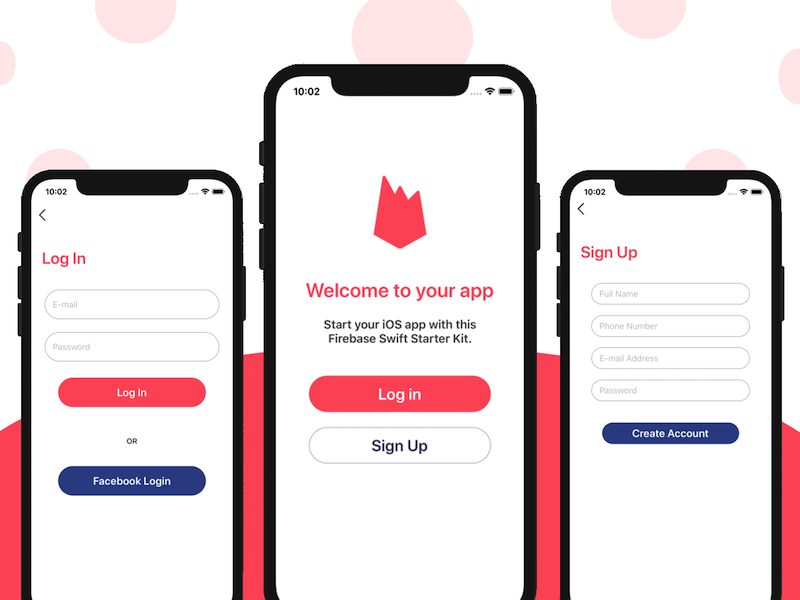
Firebase is having great momentum these days. It has gained a lot of traction among mobile developers, who are truly embracing this backend-as-a-service concept. We are using it for all of our iOS app templates. In this Firebase Swift tutorial, you'll learn how to build the login and registration screens that you can find in most of our apps. This is one of the first tutorials on this topic (Firebase Swift tutorials), and we're super excited to make this a wonderful course series. At the end of this Swift Firebase tutorial, we're going to finish these beautiful functional onboarding screens:
As an iOS programmer, every time you start developing a new app idea you find yourself in the situation of building a user onboarding flow – landing screen, log in, registration, etc. Firebase takes care of everything you need to handle on the server side (user management, OAuth, security, password storage, etc.), so it really abstracts away the hardest part of getting an app started. Let’s try to abstract away the Swift code part of the equation so that you don’t need to reinvent the wheel every time you start a new mobile app. This is also a great introduction to Firebase for Swift developers who like to learn by getting their hands dirty with some code right from the start.
For this tutorial, we’re going to assume you have some basic understanding of Swift and you’re already familiar with Xcode. We are going to use the latest Firebase Pods, so make sure you have CocoaPods installed on your machine. If you want to jump straight into the code, check out this commit diff which includes all the coded changes described below. Also, the final project can be downloaded with our Swift Boilerplate starter kit.
Ship faster with All Access. Get the Swift templates, admin panels, updates, and launch bonuses that help you build faster.
Explore All AccessGetting Started
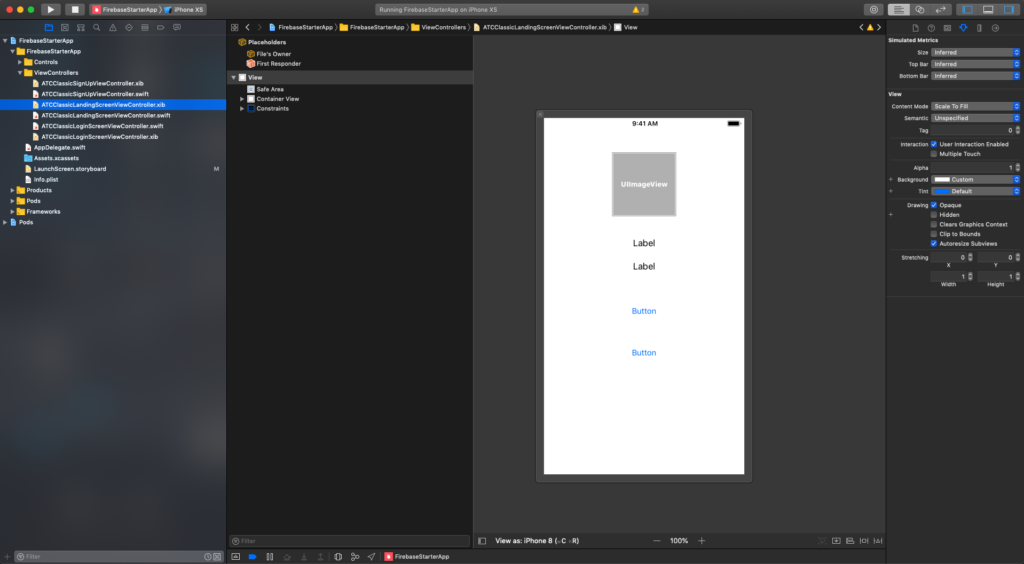
To get started, download our starter Xcode Project, and open FirebaseStarterApp.xcworkspace in Xcode. Build and run the app in any simulator or device. Let’s take a look at the high-level structure of the starter kit app:
- View Controllers – in this folder you can find the code for the three main screens (landing, login, sign up), along with their corresponding .xib files.
-
As general guidelines, this is how I decoupled responsibilities from Interface Builder and programmatic land:
- The layout logic lives in the .xib file (e.g. this button should be horizontally aligned and its top spacing should be 20px).
- The UI customizations happen programmatically, in the .swift file (e.g. colors, fonts, borders, strings, etc).
- The navigation happens programmatically (so I’m not using storyboards, due to their limitation).
-
AppDelegate – just like any other iOS App, this class represents the runtime entry point to your code. Notice how we set the root view controller of the current window to be the landing screen view controller. This basically makes our custom landing screen the first screen of the app.
-
LaunchScreen.storyboard – this is the iOS Launch Screen, which I customized to have a background color and centered icon, directly in Interface Builder
-
Assets.xcassets – this folder contains the images used in the app
-
Controls – this folder contains extensions of common UIKit components, decorating them with extra utility methods (e.g. such as instantiating a UIColor from a hex string). We won’t focus on these categories in this tutorial.
The screens are currently static, so you can only navigate to them. Nothing really happens if you tap the buttons or type into the text fields. Now that we have a better understanding of the anatomy of our Xcode starter kit, let’s dive into adding Firebase support.
Setting up Your Firebase Account
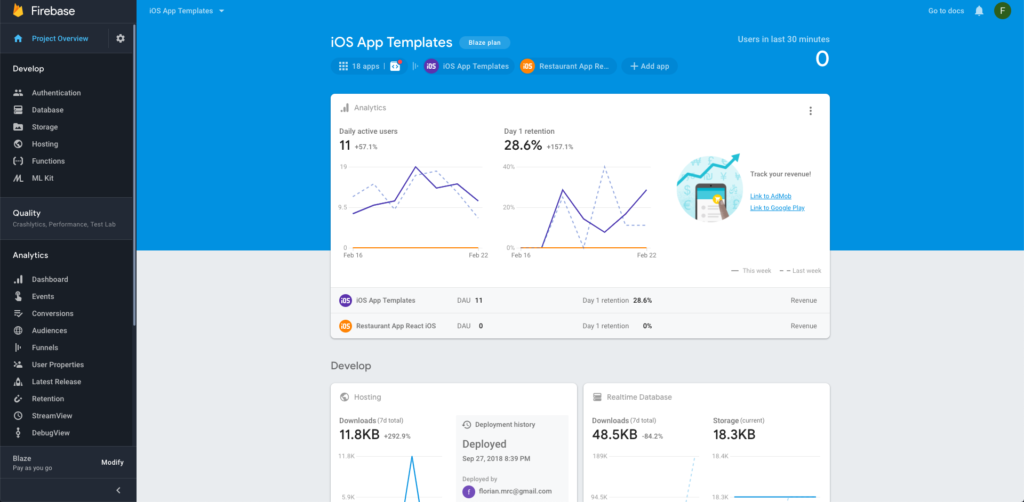
Head over to Firebase Console and create a new project (name it as you wish). Once you’ve created a new Firebase project, go to its Firebase Dashboard, by simply clicking on it in Firebase. You should be landing on this screen:
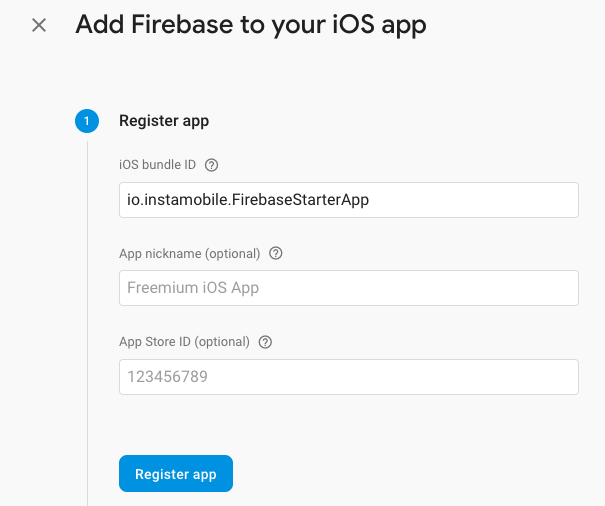
Below the centered title, press on the “Add app” button and add a new iOS app to your project. For the bundle ID, you can use “io.instamobile.FirebaseStarterApp“, which is the Bundle ID of our starter project. If you’d prefer to use your own bundle ID, make sure you update the Bundle Identifier in Xcode (“General” tab of the FirebaseStarterApp build target)
Once registered, Firebase will generate a GoogleService-Info.plist file, which you need to download and add to your project in Xcode.

That’s it – you now have a Firebase iOS project that can be used from within the Swift code. Let’s see how.
Ship faster with All Access. Get the Swift templates, admin panels, updates, and launch bonuses that help you build faster.
Explore All AccessAdding Firebase Pods Dependencies to Your App
In order to query the Firebase project from within your iOS app, we need to use the Firebase iOS SDKs, which are a set of libraries provided by Google, to make it easy for iOS developer to use Firebase in their app. These Swift SDKs are basically bridging the communication of your iOS app with the Firebase backend.
To add the Firebase SDKs to your app, just add cocoapods dependencies to the Podfile. Getting started with Cocoapods is out of scope for this tutorial, so if you’re not familiar with it, check out http://cocoapods.org.
Open the Podfile file, and add the following lines:
pod 'Firebase/Core'
pod 'Firebase/Auth'
pod 'Firebase/Firestore'
Once you do this, you need to run “pod update” in your terminal which will download the SDKs for you. A successful result will look like this in the terminal:
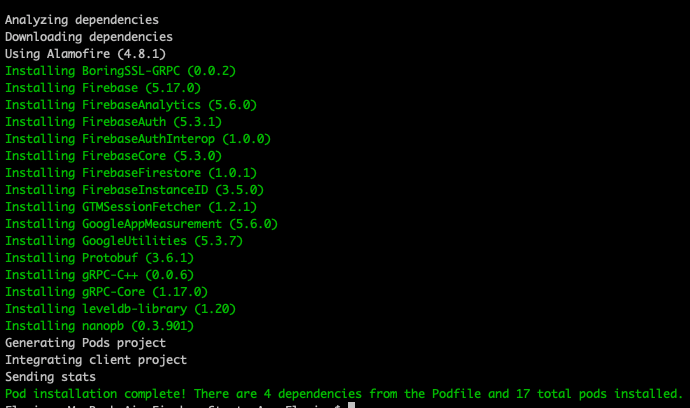
To check whether this was successful, let’s see if we can use Firebase dependencies in the code now. Open up AppDelegate.swift and add this import:
import Firebase
Then, add this line as the first line of the application:didFinishLaunchingWithOptions: method:
FirebaseApp.configure()
This builds and runs successfully in Xcode. We’re done here and ready to jump into action.
Firebase Swift User Registration
Let’s focus now on writing the code that will make user registration with Firebase work properly. The downloaded Swift starter kit only has the UI part done, so we need to hook up the registration screen to Firebase.
Ideally, we decouple the code of interacting with Firebase from our view layer (view controllers), so that our code is properly modularized. To this point, let’s create a new class named FirebaseAuthManager which will deal with all the interactions we need with our Firebase backend.
import FirebaseAuth
import UIKit
class FirebaseAuthManager {
    func createUser(email: String, password: String, completionBlock: @escaping (_ success: Bool) -> Void) {
        Auth.auth().createUser(withEmail: email, password: password) {(authResult, error) in
            if let user = authResult?.user {
                print(user)
                completionBlock(true)
            } else {
                completionBlock(false)
            }
        }
    }
}
We added a method that’s responsible for creating a new user account in Firebase and call the completionBlock when the operation finishes. It passes back to the caller a boolean flag, indicating whether the registration was successful or not. We are also printing out the newly created user information to the console.
Ship faster with All Access. Get the Swift templates, admin panels, updates, and launch bonuses that help you build faster.
Explore All AccessTo create the user, we solely rely on the FirebaseAuth SDK, by calling Auth.auth().createUser method. This will do everything from us – secure authentication to Firebase, user creation, error handling, networking, etc. Easy, right?
We have the code interacting with Firebase. Now we need to trigger it from within the app. The registration needs to happen on the signup screen, once a user presses the sign up button. Open ATCClassicSignUpViewController.swift, and locate didTapSignUpButton method. Let’s add the following code in it:
@objc func didTapSignUpButton() {
    let signUpManager = FirebaseAuthManager()
    if let email = emailTextField.text, let password = passwordTextField.text {
        signUpManager.createUser(email: email, password: password) {[weak self] (success) in
            guard let `self` = self else { return }
            var message: String = ""
            if (success) {
                message = "User was sucessfully created."
            } else {
                message = "There was an error."
            }
            let alertController = UIAlertController(title: nil, message: message, preferredStyle: .alert)
            alertController.addAction(UIAlertAction(title: "OK", style: .cancel, handler: nil))
            self.display(alertController: alertController)
        }
    }
}
So what happens here? The methods get triggered when users click the registration button. We check whether we have both e-mail and password fields filled out, and we ask the Firebase Manager to create an account. Once the manager gets back to us with the response (success or error), we show a message to communicate the result to the user. Now run the project again and add a new user in the registration flow. You should get in this state:
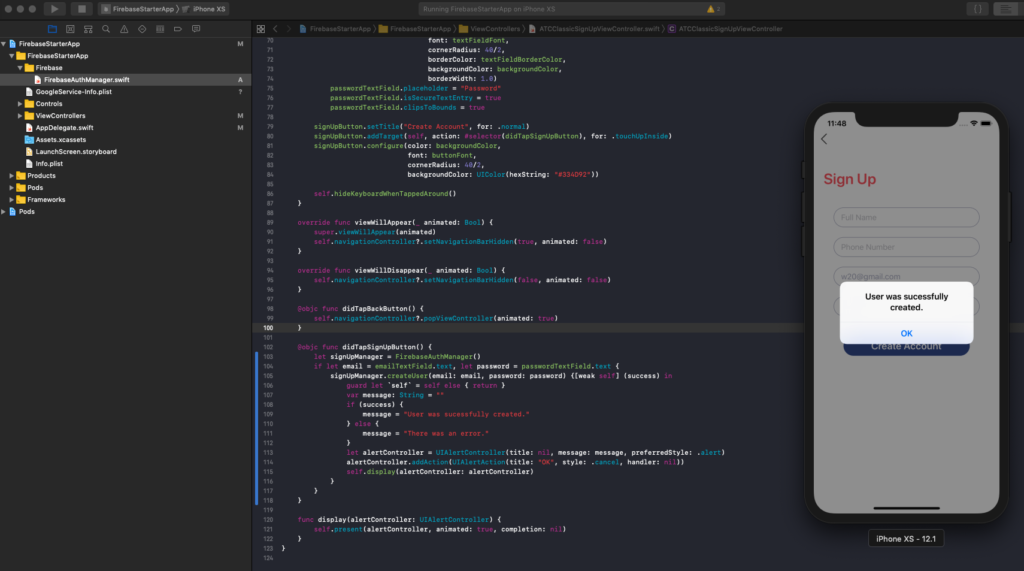
Boom! You have just created the first user of your brand new app. Congratulations!
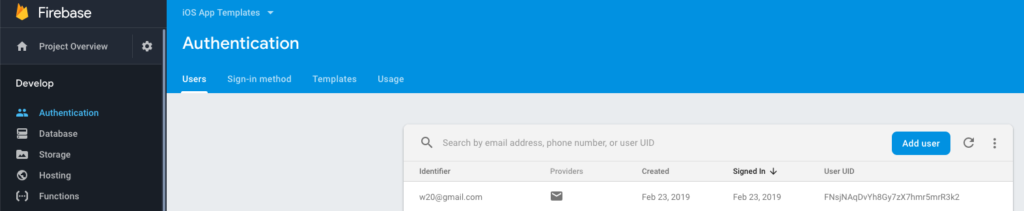
You can go to Firebase Console -> Authentication, and the new user information will be listed there.
Implementing User Login in Firebase
Now that we have a mechanism to create new users, we need to implement a flow that will allow them to sign into the app with their credentials. Let’s go back to FirebaseAuthManager class and add the login function:
func signIn(email: String, pass: String, completionBlock: @escaping (_ success: Bool) -> Void) {
    Auth.auth().signIn(withEmail: email, password: pass) { (result, error) in
        if let error = error, let _ = AuthErrorCode(rawValue: error._code) {
            completionBlock(false)
        } else {
            completionBlock(true)
        }
    }
}
Again, we are leveraging Firebase SDK to communicate with the Firebase instance and make a login request. The completion block of the Auth.auth().signIn call returns a result, which contains all the logged-in credentials necessary for further requests or the error, describing in details why the authentication failed (e.g. user not found).
Ship faster with All Access. Get the Swift templates, admin panels, updates, and launch bonuses that help you build faster.
Explore All AccessLet’s now hook up this new API to our existing Login Screen UI. The login screen is managed by ATCClassicLoginScreenViewController.swift, which is what you’ll open now. Locate the didTapLoginButton method and add the following lines of Swift code:
@objc func didTapLoginButton() {
    let loginManager = FirebaseAuthManager()
    guard let email = contactPointTextField.text, let password = passwordTextField.text else { return }
    loginManager.signIn(email: email, pass: password) {[weak self] (success) in
        guard let `self` = self else { return }
        var message: String = ""
        if (success) {
            message = "User was sucessfully logged in."
        } else {
            message = "There was an error."
        }
        let alertController = UIAlertController(title: nil, message: message, preferredStyle: .alert)
        alertController.addAction(UIAlertAction(title: "OK", style: .cancel, handler: nil))
        self.display(alertController: alertController)
    }
}
Similarly to what we did for account creation, here we are calling the sign in API and handle the result of the login request within the completion block. For our simple tutorial, we only show a success or error message. Run the code again in Xcode and you should be able to get a successful message when trying to log in with the credentials of a valid user that you’ve created in advance.
On the Firebase Console (Authentication dashboard), you’ll also notice that the last “Sign In” Timestamp will change for the specific user. Here’s how the final project will look like when you complete this tutorial:

Looking for a custom mobile application?
Our team of expert mobile developers can help you build a custom mobile app that meets your specific needs.
Get in TouchConclusion and Next Steps
In this Swift Firebase tutorial, we showed step by step how to integrated Firebase Auth into a Swift project, using Xcode. By leveraging the Firebase SDKs, integrated using Cocoapods, we can simply retrieve and store user data from Firebase with a couple of trivial API calls. We’re leaving the parsing of the auth result (username information, credential token, etc) as an exercise to the reader.
The Firebase integration in this tutorial is basic, so many more features will be needed for an awesome app. While we’re going to write down tutorials for many of these features, here’s a few things you can try on your own:
-
Storing more user information (username, full name, address, etc) using Firebase Firestore
-
Uploading profile photos using Firebase Storage
-
Persisting user credentials, so that users stay logged-in across different app sessions
-
Adding Facebook Login with Firebase
We also decoupled the concerns of server interactions into its own class (FirebaseAuthManager), so that the view layer doesn’t interact with Firebase directly. This is great architecture and a principle that you need to follow every time you write iOS code. Ideally, we’d go a step further and introduce an extra layer of abstraction, such as a protocol that will describe the interface of an Auth Manager in general. In this way, plugging in a different type of backend (Parse, WooCommerce, Shopify, Magento, REST API, etc) won’t involve any changes at all in the view layer, since the views would only deal with a protocol named “LoginManager“.
I’m going to leave all these nice to have as exercises for the reader. Please let me know if there’s anything else you want me to cover in the next tutorials or whether you need more help figuring out the implementation details of this Firebase Swift Tutorial. #shipit
For those looking how to build this in SwiftUI, I recommend checking out this SwiftUI Firebase Auth tutorial on Devbrite.