How to Implement the MVVM Design Pattern in Swift
As you know, there are a lot of design patterns applicable in Swift such as MVC, MVP, and MVVM. Depending on the project’s purpose, we choose which one is most appropriate. At iosapptemplates.com, we use a wide variety of Swift design patterns to build our functional mobile app templates. In this article, we’re going to tackle some of the advantages that come with using MVVM Swift and explain clearly with Swift code snippets.
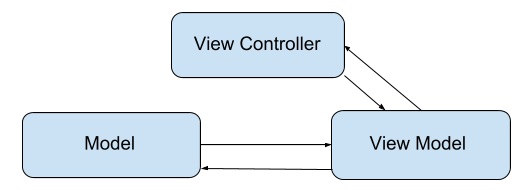
MVVM stands for Model – View (View here is View Controller (VC)) – View Model (VM). So what does it mean? It means we are introducing a new component called View Model to help with the heavy workload.
Previously, everything including the networking, fetching back the response, handling signals from UI etc, was living inside the View Controller. This made it overloaded. So in MVVM, we will divide the work and delegate responsibility to the view model.
Components Overview and Specific Roles
So in general, we have:
- View Controller: It only performs things related to UI – Show/get information. Part of the view layer
- View Model: It receives information from VC, handles all this information and sends it back to VC.
- Model: This is only your model, nothing much here. It’s exactly the same model as in MVC. It is used by VM, and updates whenever VM sends new updates
Mega Bundle Sale is ON! Get ALL of our React Native codebases at 90% OFF discount 🔥
Get the Mega BundleIn an actual project, there are two main points you should remember while working with this article:
- The convenience when separating work like this.
- Each component in charge of any particular part will be fully independent of each other.
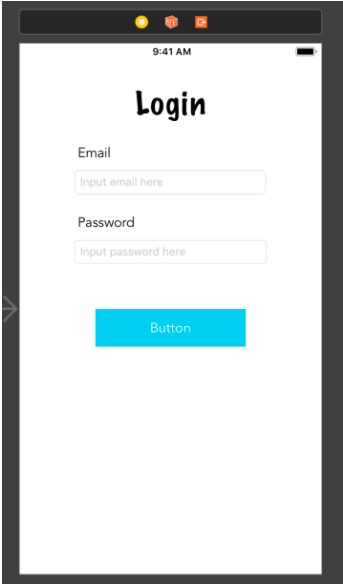
MVVM Swift Example by Building a Login Screen
In this article, we will have a login function which handles data inside the View Model. For this comparison, I will ignore the autolayout part and interface builder changes, and solely focus on the connection between VC and VM. Now, let’s get started.
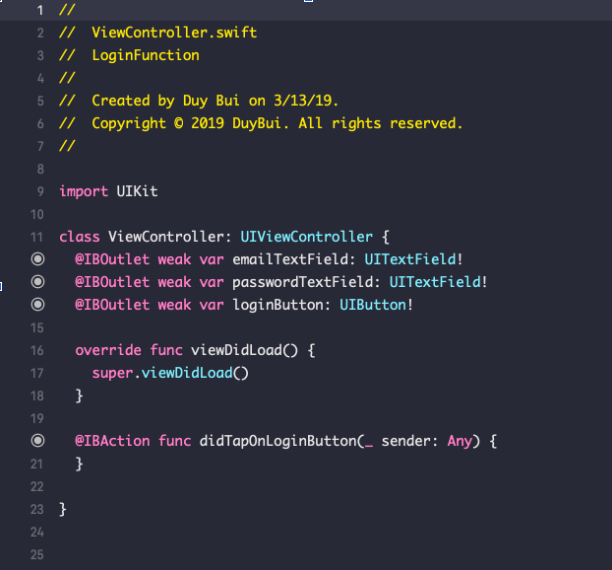
Here’s what I got in the starter project. We have all IBOutlets and IBActions – and two important files (VM, VC) of course.
Now we will talk about each file here. As we saw at the beginning of this article, we all know the role of VC is to only display and get information from UI. We will apply these points here:
- Get information from UI: that is the value from the text fields
- Show and respond to the data from VM: after tapping the Login button, we will see a message which indicates whether the user logged in successfully. It depends on the signal from VM.
Alright, the problem is how we can connect the two files to each other. There are two common ways: protocol-delegate and RxSwift. In this part, I will talk about protocol-delegate. This approach has two advantages:
- It’s very clear, we can know the basic information which is delivered between two classes
- Each component in charge of any particular part will be fully independent of each other
Mega Bundle Sale is ON! Get ALL of our React Native codebases at 90% OFF discount 🔥
Get the Mega Bundle1. Sending data from View Controller to View Model
In this part, we have three steps:
Step 1: Creating a protocol named ViewModelDelegate
This protocol is part of the view model and it has a function called:
func sendValue(from emailTextField: String?, passwordTextField: String?)
func sendValue(from emailTextField: String?, passwordTextField: String?)

Step 2: Wiring the view model to the view layer
Next, we will create a viewModel variable inside the view controller and here we will send the value of emailTextField and passwordTextField.
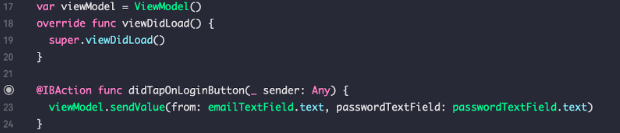
Alright, it looks cool, right? It looks like we wrapped the information in the package and sent it. The next step, we’ll see where to receive and unwrap this package.
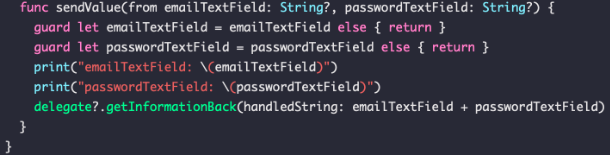
Step 3: Handling the actions in the view model
After getting information from the view controller, we can handle it in the View Model like this:

Run and fill some values in emailTextField and passwordTextField and see what happens.
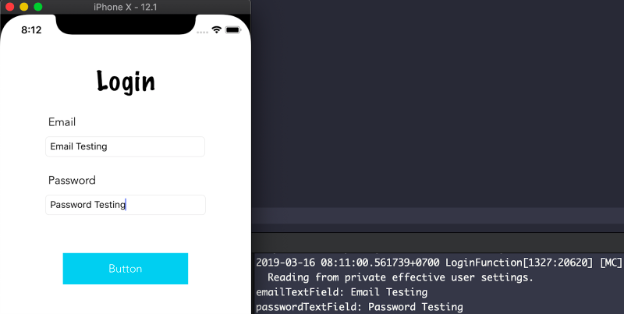
As you can see, I receive “Email Testing” and “Password Testing” from VC.
2. Sending data from the view model back to the View layer
Let’s first create another protocol called ViewControllerDelegate, and have the view controller conform to it. This means we don’t care what the view model did, we just need the result of that operation.
This is a great advantage of MVVM. Whoever is in charge of VC will not care what VM did, they just need the result. Likewise, VM does not need to know where or how VC got values from UI, it only cares what it needs to do with those values. So, all the concerns are separated, keeping all the components independent of each other.
For my example, you could see that who’s in charge of coding the view model will care about what it needs to do with emailTextField and passwordTextField, but it doesn’t need to know where these values are coming from. This business belongs to the view layer.

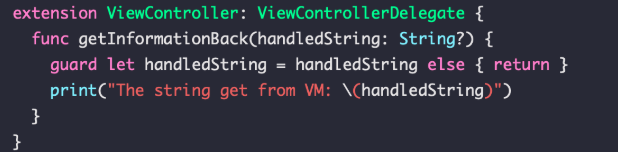
Above is the protocol that I mentioned before, and it has a function named getInformationBack. It means we will get values back from VM through this method.
In ViewModel, let’s add a weak delegate variable
weak var delegate: ViewControllerDelegate?
and send the value which is retrieved from emailTextField and passwordTextField. In this tutorial, I will not handle anything too complicated, just combine the two strings into one, like in the following image:
Alright, here, we wrapped the final output after handling the value (actually we only concatenated them, but in an actual project, you could do more like validating the email, password and tell VC if it’s available). Let’s now see how we can retrieve the data back into the view controller.
In viewDidLoad of VC, we have this line of code: viewModel.delegate = self. Remember that we have a delegate variable in VM, right? This line of code is kind of VC telling VM that it will do the delegation.
And then, we just need to conform the protocol and get the value back from VM.
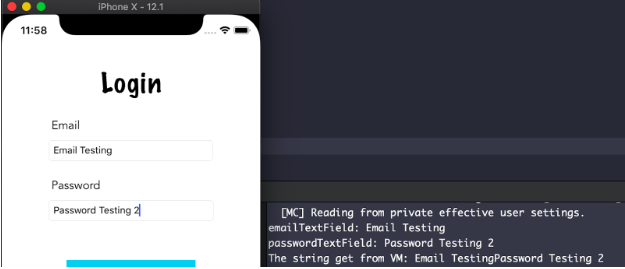
Build and run the Xcode project again. We will have all that we need now. We can send the data from VC to VM and vice versa.
Looking for a custom mobile application?
Our team of expert mobile developers can help you build a custom mobile app that meets your specific needs.
Get in TouchConclusion
Let’s wrap up what we have done. In MVVM, we assigned the tasks related to calculate, handle data etc. to VM. We only allow the view layer to do UI chores and get values from UI and user interaction. In this way, each design component is in charge of only one specifically dedicated concerns and they are completely independent of each other. That’s all. I hope after this article, you will have an overview of MVVM Swift and how to implement it using the protocol-delegate design pattern.
MVVM is a powerful architecture pattern in Swift and it allows programmers to separate concerns of their design components, so getting a grasp of it is highly essential to any great iOS engineer.