With every release of Xcode, Apple provides us with extremely useful improvements and new features. And as always, from Xcode 11.4 (beta version – up until the publish date of this article), we get another piece of good news from them. That is we can simulate push notifications on the iOS simulator. Finally! Yes, you’re not mistaken, it’s time to say goodbye to the annoyance of testing on physical devices whenever we want to implement and test push notifications.
In this tutorial, we are going to learn how to test push notifications on the iOS simulator.
1. Setup Configuration in Xcode
In this chapter, we are going to learn how to use iOS simulators to receive push notifications. You don’t need to have a deep knowledge of Push Notification related code to understand the guided experience. However, we will also not cover too much on the configuration details front, but we’ll just introduce how to integrate it with simulators.
To learn more, we highly recommend you to read this article: Push Notifications with Firebase in Swift 5. It had everything you need related to Push Notifications on iOS.
Okay, enough talk! Let’s code now.
Inside application(_:didFinishLaunchingWithOptions:) in AppDelegate.swift file, add this block of code:
func application(_ application: UIApplication, didFinishLaunchingWithOptions launchOptions: [UIApplication.LaunchOptionsKey: Any]?) -> Bool {
   // Override point for customization after application launch.
   UNUserNotificationCenter.current().requestAuthorization(options: [.alert, .sound, .badge]) {(granted, error) in
      // Use granted to check if permission is granted
   }
   return true
}
With this, we have just requested permissions to receive push notifications. Do not forget to import UserNotifications to compile successfully.
Basically, with just this much code, we can get notifications if our app is in the background. To be able to receive these notifications while we are in the foreground, you need a few more steps.
First of all, we assign the delegation of UNUserNotificationCenter to self
UNUserNotificationCenter.current().delegate = self
Next, we just need to conform UNUserNotificationCenterDelegate with the following function:
extension AppDelegate: UNUserNotificationCenterDelegate {
    func userNotificationCenter(_ center: UNUserNotificationCenter, willPresent notification: UNNotification, withCompletionHandler completionHandler: @escaping (UNNotificationPresentationOptions) -> Void) {
        completionHandler([.alert, .sound, .badge])
    }
}
That’s all the code, we reached halfway of this iOS tutorial. In the next part, we are going to set up some configurations to make it work.
2. Simulate Push Notifications on Simulators
a. Create an APNS Payload File
The APNS (stands for Apple Push Notification Service) payload file is a JSON file. In this file, we will define the information we would like to use. You can refer to Apple’s official documentation for more details. Generally, it looks like this:
{
"aps": {
"alert": {
"title": "iOS App Templates",
"body": "This is the tutorial about push notification on simulators",
"sound": "default"
},
"badge": 4
},
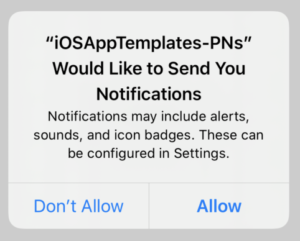
"Simulator Target Bundle": "iosapptemplate.tutorial.iOSAppTemplates-PNs"
}
Then, save it anywhere on your Mac.
b. Trigger Push Notifications
Option 1: Drag and drop
– Drag the payload file we have just saved and drop it onto the simulator. You will see the notification getting pulled down.
Option 2: Use Terminal. This option can be a bit of a challenge.
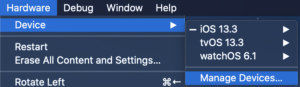
– Step 1: Find your simulator identifier. On the toolbar of Simulator, choose Hardware -> Device -> Manage Devices
In the screen appearing after that, you select the Simulator tab. Find the simulators you are using and right-click to get its identifier

You can also run this command line to find the identifier of the current simulator in the list.
xcrun simctl list
– Step 2:
After having the simulator identifier, you can trigger push notifications like this:
xcrun simctl push <the identifier of device or simulator> <bundle identifier> <path to apns file>
For example,
xcrun simctl push AD625D82-7F92-41D2-9CD9-2839BA74D4F6 iosapptemplate.tutorial.iOSAppTemplates-PNs payload.apns
– Note: If the payload’s content included the Simulator Target Bundle key already, we will not need it anymore. So it can be shortened like this
xcrun simctl push AD625D82-7F92-41D2-9CD9-2839BA74D4F6 payload.apns
We could even write more neatly if you were only running one simulator. Use booted instead of the identifier
xcrun simctl push booted payload.apns
Let’s try and see the magic. Now you are able to send any type of push notification to the iOS simulator. No need to ever go through the hassle of testing push notifications on real devices.
Conclusion
Isn’t that great? This is one of the features that, honestly, iOS developers have been waiting for a long time, and finally, it has been completed and released. Currently, if you notice, we do not see the badge number nor the sound when notifications come up, but we think this will be fixed in the future, for sure. Thanks for reading and if you like it, please share this tutorial and let us know if you have any questions. See you next time.