MapKit Tutorial: How to Add Maps to Your iOS App in Swift

Adding a map to an iOS app is a widely spread feature. Maps make mobile apps more interactive and improve the user experience tremendously. In our mobile app templates, we integrated maps in several apps, such as in the Store Locator, Classifieds App, or Real Estate app. In this MapKit tutorial, we are describing our experience of working with MapKit to help you learn how to add maps to your iOS app in Swift.
1. Introduction
Have you ever wanted to build a map in your phone application? Does it seem too difficult of a task? If so, then this article is for you. Today, we will talk about MapKit.
So, what exactly is MapKit? It is a useful framework built on data and APIs of Apple Maps which helps iOS developers display maps easily in their iPhone apps.
The most important feature of MapKit we need to pay attention to is the MKMapView class — a subclass of UIView. This class has all the features needed, such as map, satellite, or even the current location. Hand gestures may be used on the screen to change the geographical region. It’s amazing, right?! But that isn’t all.
We can also add annotations, photos, titles and mark specific locations on the map. Another great thing is that we can receive notifications such as changing the current location of the user or region of the map, through MKMapViewDelegate protocol. And today, we’ll learn how to do it. Now, let’s get started with this extensive MapKit tutorial.
Mega Bundle Sale is ON! Get ALL of our React Native codebases at 90% OFF discount 🔥
Get the Mega Bundle2. Permissions and the current location
Normally, we would have a starter project for you. But there’s not much to talk about it, so we’ll actually write the code from the beginning to the end. Hopefully this will be an additional incentive for the readers to follow through.
Step 1: Drag the Map Kit View from the library to the screen.
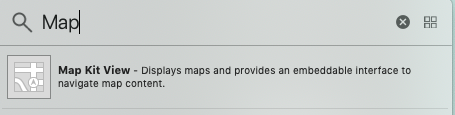
By using the Interface Builder, drag a Map Kit View object to your storyboard. You can pin it to the edges of the screen (or the safe area if you refer to this one), for simplicity (by using auto layout constraints, of course).
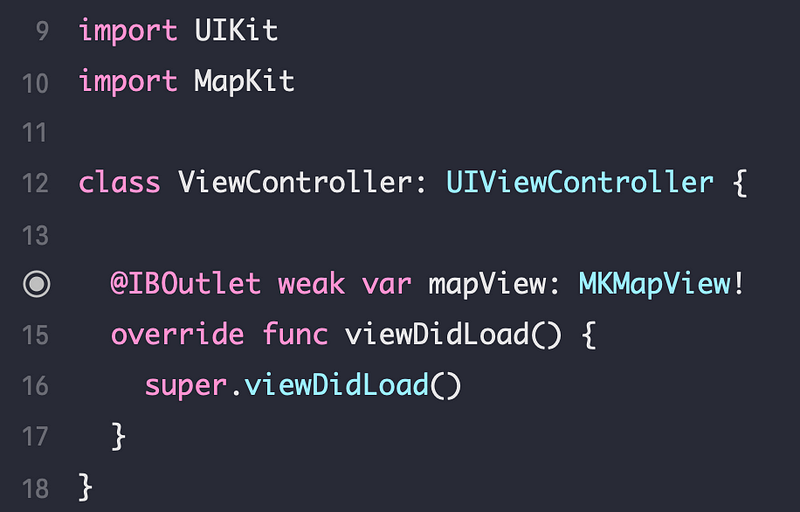
Step 2: Create an IBOutlet in the View Controller that manages the MapKitView
The next thing we need to do is to drag an IBOutlet connection from the Map Kit View on the screen to the UIViewController. Do not forget to import the MapKit library, so that the code compiles successfully. It looks like this:
Now, let’s build and run the iOS app to see the magic.
-ad50df944cfccfb94338b1ec86c79cf4.png)
BOOM, it looks awesome, right? MapKit has provided us with the map and now all we need to do is observe and handle the different events such as changing the current location or region etc.
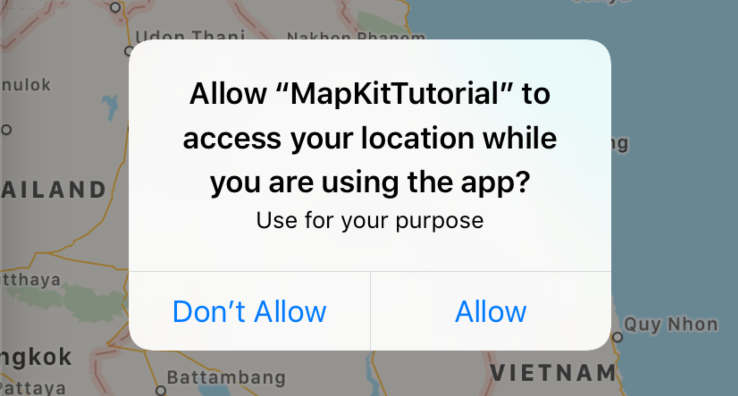
Before doing all that, however, we need to first do one important thing: we must seek permission to access the user’s location. Of course, if you do not do that, your application still works and the map still displays normally. But you have to do that because location information is one of the private information belonging to users. We have to ask their permissions before getting it. If you fail to acquire permissions first, you risk your app to crash.
In the Info.plist file, we add a new item like this:
![]()
In the description part, you have to explain to the user why you need their permissions. Ours is “Use for your purpose” (let’s try to say something that convinces them to accept).
Step 3: Check the Location Service.
First of all, we will create a variable called locationManager:
let locationManager = CLLocationManager()
Then, in viewDidLoad(), we have:
if CLLocationManager.locationServicesEnabled() {
   // continue to implement here
} else {
   // Do something to let users know why they need to turn it on.
}
The locationServicesEnabled function is used to check whether a user has turned on their location service or not (shown in Settings on iPhones). If they have, we can continue to implement our code. Otherwise, we need to do something to let users know why they need to turn it on (like sending a pop-up to inform the user).
Mega Bundle Sale is ON! Get ALL of our React Native codebases at 90% OFF discount 🔥
Get the Mega BundleStep 4: Check Location Authorization Status
To do that, we’ll create a function such as:
func checkAuthorizationStatus() {
  switch CLLocationManager.authorizationStatus() {
    case .authorizedWhenInUse: break
    case .denied: break
    case .notDetermined: break
    case .restricted: break
    case .authorizedAlways: break
  }
}
We created a function called checkAuthorizationStatus() that basically, it’ll check what the authorization status is. There are five cases that we need to handle:
-
authorizedWhenInUse: the only time which the app is authorized to get the user’s location is when your app is open.
-
authorizedAlways: it means that the app can always get your location when it is in the background. It’s kind of the Maps application, this app always needs your location when you’re getting directions somewhere or you’re walking around.
-
notDetermined: at the first time, when the pop-up displays, they haven’t picked allow or not allow, so it depends on your project which you need to handle correspondingly.
For the two remaining cases, you will need to send the user a notification depending on the situation, such as the user not giving permission for showing their location. In this article, we will not focus on these cases, however, when you are working on the actual project you will also need to handle these. They are just as important as the first two
In this article, for educational purposes, let’s just handle the first case (authorizedWhenInUse). So, just keep going – we will write this line of Swift code:
mapView.showsUserLocation = true
This code will show the current location of the user. In conclusion, all lines of code look like this:
override func viewDidLoad() {
  super.viewDidLoad()
  checkLocationServices()
}
func checkLocationServices() {
  if CLLocationManager.locationServicesEnabled() {
    checkLocationAuthorization()
  } else {
    // Show alert letting the user know they have to turn this on.
  }
}
func checkLocationAuthorization() {
  switch CLLocationManager.authorizationStatus() {
  case .authorizedWhenInUse:
    mapView.showsUserLocation = true
   case .denied: // Show alert telling users how to turn on permissions
   break
  case .notDetermined:
    locationManager.requestWhenInUseAuthorization()
    mapView.showsUserLocation = true
  case .restricted: // Show an alert letting them know what’s up
   break
  case .authorizedAlways:
   break
  }
}
Now, let’s build and run again the Xcode project. BOOM, it showed the current location. Keep in mind that you can simulate any location in the iOS Simulator.
-313fe4f8920de45171eea5103d45ef84.png)
So, what do you think now? It’s really cool, right?! We get a lot of functionality with just a handful of lines of code. But, that isn’t even all. In this next section, we are going to show you an interesting feature of the MapKit that we’re sure you will really like it. That’s displaying an arbitrary list of places on the map. You will be able to build your own Store Locator app after you fully understand this MapKit tutorial.
Mega Bundle Sale is ON! Get ALL of our React Native codebases at 90% OFF discount 🔥
Get the Mega Bundle3. Displaying a list of places on the map
Let’s build a feature that will display a list of stadiums on the map. Here’s how we achieve that quickly in Swift.
Step 1: Creating the Model objects
Let’s create a model object for a Stadium.
struct Stadium {
  var name: String
  var lattitude: CLLocationDegrees
  var longtitude: CLLocationDegrees
}
And next, let’s create a hardcoded list of stadiums in England inside the viewDidLoad(). These are the stadiums we want to plot on the map:
let stadiums = [Stadium(name: “Emirates Stadium”, lattitude: 51.5549, longtitude: -0.108436),
Stadium(name: “Stamford Bridge”, lattitude: 51.4816, longtitude: -0.191034),
Stadium(name: “White Hart Lane”, lattitude: 51.6033, longtitude: -0.065684),
Stadium(name: “Olympic Stadium”, lattitude: 51.5383, longtitude: -0.016587),
Stadium(name: “Old Trafford”, lattitude: 53.4631, longtitude: -2.29139),
Stadium(name: “Anfield”, lattitude: 53.4308, longtitude: -2.96096)]
Step 2: Adding the stadiums to the map.
This is extremely easy to do in Swift. MapKit makes adding places on a map such as a breeze:
func fetchStadiumsOnMap(_ stadiums: [Stadium]) {
  for stadium in stadiums {
    let annotations = MKPointAnnotation()
    annotations.title = stadium.name
    annotations.coordinate = CLLocationCoordinate2D(latitude:
      stadium.lattitude, longitude: stadium.longtitude)
    mapView.addAnnotation(annotations)
  }
}
It looks pretty straightforward, right? For each stadium on the list, we have created an MKPointAnnotation instance. The MKPointAnnotation class helps us create an object tied to the specified point on the map. Next, we assign the stadium’s name and coordinate to that object. After that, we add it to the map view.
Once all that is done, we call this function inside the viewDidLoad with the list of stadiums that are already created. Let’s run and build the Xcode project:
override func viewDidLoad() {
  super.viewDidLoad()
  checkLocationServices()
  fetchStadiumsOnMap(stadiums)
}
As a side note, if your place is quite far from England, for example, you cannot see these places on your phone. For this reason, you will need to zoom into the map, then slide across to England. Then you will see a pinpoint like this:
-30aa2fd7bc99e92ab22848f0af449176.png)
Now, let’s continue to zoom in. You will see all the stadiums which we have, appear on your screen:
-e380b78a42fcf88d65a75e2ed34c7020.png)
Looking for a custom mobile application?
Our team of expert mobile developers can help you build a custom mobile app that meets your specific needs.
Get in TouchSummary
This article has basically guided you on how to create a map, ask permissions from the user to access their location and show the current geolocation by using MKMapView. It also showed you how to pull up a list of places on the map.
We hope that with this article, you are now confident in creating a simple map as well as integrating more features into your mobile application. We hope you will like this article. Here is the complete Swift source code. Please share this article to help us reach more developers with this awesome MapKit Tutorial. Happy coding!