Understanding The Most Popular iOS Design Patterns in Swift

If you’re an iOS developer with advanced skills who has gone through a lot of iOS projects, you will surely know that choosing a suitable design pattern is extremely important. It helps your project run smoothly and become more readable, flexible and reusable. In more than 20 Mobile App Templates, we have carefully considered all the most popular iOS design patterns.
Based on that experience, in this Swift tutorial, we are going to discuss all the iOS design patterns, to give you a high-level overview of what is possible and common in iOS app development.
1. Introduction to iOS Design Patterns
Imagine you are building a house and you must have a detailed designed plan. If the plan is of poor quality, when building, the workers will run into difficulties. The house would certainly not be beautiful or secure. This applies to any iOS project as well. In fact, programming code that runs successfully is not difficult, but mastering the craft of beautiful architecture beyond MVC will set your app for success and scalability in the long run.
The problems with a mediocre architecture will occur when there are changes or updates from the clients, product managers, or users. Building new features becomes hard without a solid initial design. If good architecture pattern hasn’t been used, it will be difficult for you to do any further modifications without breaking your current codebase. Additionally, when many members of your team have to change the code in the same large file, you’ll find yourself in big trouble, due to merge conflicts. Your team’s productivity will slow significantly.
Ok, no more talking why we should explore all the iOS design patterns available to us. Let’s talk about them already. Today, we’ll take a look at the four most popular iOS design patterns:
-
MVC: Model – View – Controller
-
MVP: Model – View – Presenter
-
MVVM: Model – View – View Model
-
VIPERS: View-Interactor-Presenter-Entity(a.k.a Model)-Router
Mega Bundle Sale is ON! Get ALL of our iOS App codebases at 90% OFF discount 🔥
Get the Mega Bundle2. The relationship between Model and View
You may wonder why view-model always appear in all patterns. Yeah, you’re right. For each application, these two parts play important roles:
-
Graphics User Interface (also known as View): displays data and receives user’s interactions, such as tap gestures, long press, shaking, etc.
-
Data (also known as Model): the actual user information stored as the state of your app (either on server or iPhone).
In a simple application, we can show the information we get from models directly onto the screen. For any changes from UI, we update back our model, but that’s not all. The bigger your project gets, the more complicated the app logic becomes. We have to validate, format, convert data or even get it from the server and then updating the views immediately when data changes occur.
The general solution of iOS design patterns in this regard is to reduce the interdependence, between components, by separating them in smaller components, with restricted responsibilities. In this Swift article, we’ll figure out how they resolved this issue. Instead of introducing a bunch of complex and abstract theories (which you can easily search on Google) we will make a simple app and apply all the iOS architecture patterns (and explain to you while showing you Swift code examples, of course), to make it easier to understand.
Note: Since this article solely focuses on analyzing patterns, we won’t dive into the analysis of functions in detail.
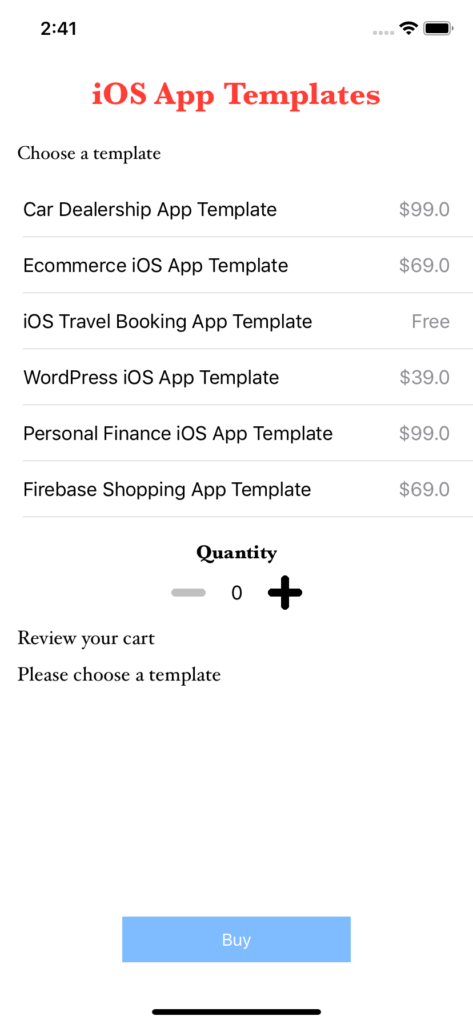
You can download the starter project here. Basically, the app shows an order of the iOS App Templates screen. You can select a template that you like and choose the quantities that you want to buy. Then the app will simply show the confirmation information. Open the project and run it in Xcode. It should look like this:
3. MVC
Now let’s dive into MVC first. Let’s take a look at the following Swift code:
{
  var yourOrder: Order?
  override func viewDidLoad() {
    super.viewDidLoad()
    dataInitialization()
    updateUIBy(yourOrder)
  }
  @IBAction func didTapOnDecreaseButton(_ sender: Any) {...}
  @IBAction func didTapOnIncreaseButton(_ sender: Any) {...}
  @IBAction func didTapOnBuyButton(_ sender: Any) {...}
  private func dataInitialization() {
    yourOrder = Order(title: "", quantity: 0, price: 0.0)
  }

  private func updateUIBy(_ order: Order?) {...}
}
extension ViewController: UITableViewDelegate {
  func tableView(_ tableView: UITableView, didSelectRowAt indexPath: IndexPath) {...}
}
Mega Bundle Sale is ON! Get ALL of our iOS App codebases at 90% OFF discount 🔥
Get the Mega BundleThis looks just a like a regular view controller, right? Our process is as follows:
-
Create a variable called yourOrder. This will be our model. And we also have dataInitialization function which initializes the state.
-
Create a function called updateUIBy to update the UI based on yourOrder's change. So you can see the Controller has updated the UI immediately whenever the model changes
-
Notice the following functions:
-
didTapOnDecreaseButton
-
didTapOnIncreaseButton
-
tableView (_ tableView: UITableView, didSelectRowAt indexPath: IndexPath)
These are the places where the user will interact with the View, and after the Controller receives the new data, it will update the data model, by calling the updateUIBy function to update the view layer. Let's see what's inside one of them:
func tableView(_ tableView: UITableView, didSelectRowAt indexPath: IndexPath) {
    yourOrder?.setTitle(templates[indexPath.row].title)
    yourOrder?.setPrice(templates[indexPath.row].price)
    updateUIBy(yourOrder)
  }
Now let's compare the architecture in the following picture with our project
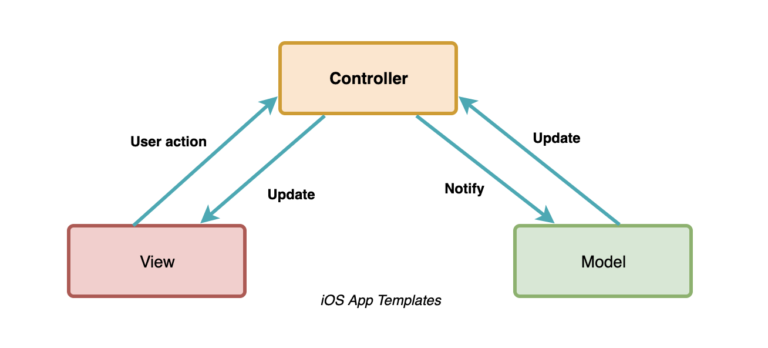
We will have: View <-> Storyboard file, Controller <-> ViewController file, Model: Regular file.
As explained above, the controller will play a managing role, keeping in touch between model and view. Based on the model’s changes, it will decide what the view will need to show. It will even change the view if needed. Download the completed source code here for more details. You will understand more of what we are describing here for sure. Let’s run and explore this app a bit.

It looks quite ok but as you can see, ViewController does almost everything. In the actual project, it also has to handle other logic around the views such as animations, showing/ hiding subviews, navigation, passing data, logging, etc as well as the logic of the data model layer. This will make the ViewController bigger and bigger, which is the reason why people often call MVC Massive View Controller. It ends up following the wrong footsteps of the old design patterns. Let’s move on the next pattern to see if we can get better at designing iOS apps.
Mega Bundle Sale is ON! Get ALL of our iOS App codebases at 90% OFF discount 🔥
Get the Mega Bundle4. MVP
Alright, let’s get started with Model – View – Presenter design pattern. First, we create a protocol called OrderViewProtocol and a class called OrderViewPresenter like this:
protocol OrderViewProtocol: class {
  func updateModel(order: Order?)
  func updateUI(order: Order?)
}
class OrderViewPresenter {

  private var order: Order?
  private weak var delegate: OrderViewProtocol?

  init(order: Order?, delegate: OrderViewProtocol?) {
    self.order = order
    self.delegate = delegate
    self.updateUIByOrder()
  }

  func setInformation(title: String, price: Double) {...}

  func increaseQuantity(currentQuantity: String?) {...}

  func decreaseQuantity(currentQuantity: String?) {...}

  func updateUIByOrder() {
    delegate?.updateModel(order: order)
    delegate?.updateUI(order: order)
  }
}
Then we adjust our ViewController like this:
  var yourOrder: Order?
  var orderViewPresenter: OrderViewPresenter?

  override func viewDidLoad() {
    super.viewDidLoad()

    dataInitialization()
    orderViewPresenter = OrderViewPresenter(order: yourOrder, delegate: self)
  }

  @IBAction func didTapOnDecreaseButton(sender: Any) {
    orderViewPresenter?.decreaseQuantity(currentQuantity: quantityLabel.text)
  }

  @IBAction func didTapOnIncreaseButton(sender: Any) {
    orderViewPresenter?.increaseQuantity(currentQuantity: quantityLabel.text)
  }

  private func dataInitialization() {...}

  private func updateUIBy(order: Order?) {...}

extension ViewController: UITableViewDelegate {
  func tableView(tableView: UITableView, didSelectRowAt indexPath: IndexPath) {
    orderViewPresenter?.setInformation(title: templates[indexPath.row].title, price: templates[indexPath.row].price)
  }
}
Before analyzing the code, we need to know what Presenter’s role is. It will handle the logic such as user’s interactions and UI updates by using the delegate. It is also in charge of updating models when there are any changes. So, our process is as follows. There are two big different points here. Do you remember these three functions in the MVC pattern?
-
didTapOnDecreaseButton
-
didTapOnIncreaseButton
-
tableView (_ tableView: UITableView, didSelectRowAt indexPath: IndexPath)
Yes, in the MVC pattern, we used some lines of code to update our model and the UI. But what about now? Only one line of code. What we need to do here is to pass all information from UI changes to the presenter. The presenter will do the rest. Let's take a look this
-3bc53ce44c791c85492a9c27a3e67019.png)
The ViewController in this pattern is considered part of the view layer. It only gets/shows data on UI. That's all. This has reduced the workload for ViewController significantly, and it just needs to update the user interface based on the latest changes of the model via the delegate pattern.
extension ViewController: OrderViewProtocol {
  func updateModel(order: Order?) {
    yourOrder = order
  }

  func updateUI(order: Order?) {
    updateUIBy(order)
  }
}
Now, please download the full source code here and run the app. You’ll see the result is exactly the same, but now we have more components, with more specific responsibilities, which is the most important design principle we need to keep in mind when writing iOS code.
Mega Bundle Sale is ON! Get ALL of our iOS App codebases at 90% OFF discount 🔥
Get the Mega Bundle5. MVVM
It may be said that the MVVM pattern is one of the most favorite architectures at the moment in the iOS developer community. Like the Presenter in MVP architecture, the ViewModel looks like something connecting the View and the Model. But it still has some key different things:
-
A ViewModel class can be used for multiple views since it does not need to know anything about the views.
-
ViewModel classes communicate with View classes through binding data or Observer design pattern.
Because of this point, when we hear the name MVVM, we immediately think of the Reactive Programming and vice versa. It became a modern and effective pattern that has been developing very strong in recent years. Notice that if you don’t use binding data in MVVM, just use ViewModel as a class doing something like handling data or updating views, it’ll make ViewModel look like the Presenter and it will bring the architecture back to MVP.
For this Swift MVVM pattern, we wrote a detailed tutorial here. Please check it out to thoroughly comprehend it.
6. VIPER
To talk about the iOS VIPER pattern, we need to analyze it in detail, otherwise, it will feel very ambiguous and confusing. Therefore, in this section, we will talk about an overview of VIPER and will write a separate article about this pattern in the near future. You can find and subscribe to our blog to get the latest articles.
In the above patterns, the burden of these intermediate layers (such as Presenter or ViewModel) is also pretty much when it needs to handle the logic of views like animations or navigation (especially the navigation flow and passing data between screens) as well as the logic of the models. Let’s see how VIPER makes navigation more organized.
-c302820fa977e834f346658a0c719729.png)
As you can see, in VIPER, each part does one single specific task.
-
View: Nothing changes here. The view is responsible for sending the user actions to the intermediate layers and showing whatever they receive back.
-
Interactor: This is the most important part of this pattern. Here is the place to solve business logic.
-
Presenter: Like the Presenter’s role in MVP or ViewModel’s role in MVVM, the presenter will handle the data which is received from the user’s interactions. It will send the result to the view layer. It also asks the router for navigation stuff.
-
Entity: The entity is the Model as usual.
-
Router: VIPER parts will connect to each other through Router/ Wireframe. It keeps all the references and is responsible for the navigation part.
As you can see this pattern subdivides a lot of tasks for each specific class. By isolating concerns into their own components, we achieve a more scalable architecture. Another great thing is that most of the communication between different layers happens via delegating, so they are very independent and can be easily replaced and extended. This iOS design pattern heavily leverages Swift protocols, which makes it a perfect architecture fit for Swift programming language.
Looking for a custom mobile application?
Our team of expert mobile developers can help you build a custom mobile app that meets your specific needs.
Get in TouchConclusion
Finally, we went through the most popular iOS design patterns. They mean a lot to your app and we hope this article can help you understand them more. In fact, the choice of patterns depends on the ability of the team or the complexity of the project. Last but not least, don’t just put a bunch of code in a class just because it’s easier at that time even when it conflicts with its responsibility. Always think hard before writing down the code.
And before finishing, we have a challenge for you. In the MVVM part, we don’t have the example code and we’ll give this interesting part for you. (You can refer to this article to understand the concept of MVVM pattern in more details. After that we think you can do it easily).
Please share this article with your community to help us spread the world. Happy coding!