Build a Tinder-like Card Swipe in Swift with Koloda View | iOS Tutorial

Over the past few years, along with the popularity of social networking applications, dating apps have also rapidly emerged. One of these most prominent applications is Tinder. It’s not only an awesome dating app, but it also created new iOS trends on view animations or transitions, such as the Tinder Card Swipe or Tinder UI (our Swift Dating App was inspired by Tinder).
In this iOS tutorial, we are going to learn how to build the Tinder Swipe Cards in Swift, so that you can include this feature into your iOS apps. There are currently a few libraries supporting this type of swipeable cards and one of them is KolodaView. In this tutorial, we’ll show you how to implement this animation in Swift, with code examples.
1. Introduction
To learn general details about the Koloda View library, you can refer to its official documentation here. In this part, we’ll just give you a high-level overview of it. The highlight of this library is the swipe-to-like interface inspired by Tinder. The team did a great job of explaining how to design the UI and how it works. You can read their tutorials to understand more about their mechanism of action. Koloda View library uses the same the dataSource and delegate design patterns, by leveraging protocols. These patterns were inspired from the UITableView and UICollectionView design. It’s really convenient for iOS engineers to use this library, given they are already familiar with the overall architectural patterns. All we need to do is to conform our view controller to two protocols, and handle the necessary functions. Now let’s get started to learn concretely how to build an app like Tinder, by leveraging Koloda View for the Tinder-esque card interface.
Mega Bundle Sale is ON! Get ALL of our React Native codebases at 90% OFF discount 🔥
Get the Mega Bundle2. Building the iOS Tinder Cards in Swift
First of all, since this is a third-party library, you need to install it from Carthage, CocoaPod or manually (“drag-drop” stuff), in order to include it as a dependency to your Xcode project. We’ll install KolodaView via CocoaPods, as usual. So add to your Podfile the following pod dependency:
pod "Koloda"
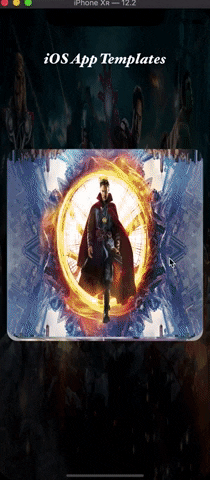
Let’s run the newly created Xcode project and then write the code on the workspace with the same name. Our theme for this Swift tutorial will be about Marvel’s heroes. When we are writing this article, the whole world is going crazy over Endgame – the movie of the decade so we want to make this as a tribute about a long journey as well as our Iron Man. If you’re not familiar with the movie, no worries, you’ll understand the tutorial entirely anyway. Now, let’s write some code.
Step 1: Setting up Tinder UI
By using the Interface Builder, drag a UIView object to your storyboard. Add constraints for it (you can refer to our way or add your own constraints). In the Identity Inspector, we set a custom class (KolodaView) for our UIView object as follows:
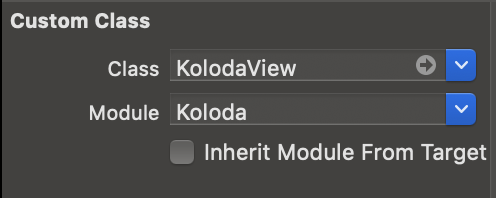
Pay attention to set the Module as Koloda, otherwise, your app will instacrash. After that, drag an IBOutlet connection from the UIView on the screen to the UIViewController. Do not forget to import the Koloda library, so that the code compiles successfully.
Step 2: Conform to DataSource and Delegate Protocols
In the viewDidLoad of your view controller, let’s add the following code snippet:
override func viewDidLoad() {
    super.viewDidLoad()

    kolodaView.dataSource = self
    kolodaView.delegate = self
  }
}
As we said, the way we conform to these protocols is the same way we’ve always done with UITableView or UICollectionView. We’ve separated the KolodaView delegate/dataSource into their own extensions to make it easier to explain:
extension ViewController: KolodaViewDelegate {
  func kolodaDidRunOutOfCards(_ koloda: KolodaView) {
    koloda.reloadData()
  }

  func koloda(_ koloda: KolodaView, didSelectCardAt index: Int) {
    let alert = UIAlertController(title: "Congratulation!", message: "Now you're \(images[index])", preferredStyle: .alert)
    alert.addAction(UIAlertAction(title: "OK", style: .default))
    self.present(alert, animated: true)
  }
}
extension ViewController: KolodaViewDataSource {

  func kolodaNumberOfCards(_ koloda:KolodaView) -> Int {
    return images.count
  }

  func koloda(_ koloda: KolodaView, viewForCardAt index: Int) -> UIView {
    let view = UIImageView(image: UIImage(named: images[index]))
    view.layer.cornerRadius = 20
    view.clipsToBounds = true
    return view
  }
}
Mega Bundle Sale is ON! Get ALL of our React Native codebases at 90% OFF discount 🔥
Get the Mega BundleAs you can see, the two delegate methods inside KolodaViewDataSource look the same as UITableViewDataSource’s functions. In there, we declare the numbers of items (Tinder Cards) and how they will be displayed. For KolodaViewDelegate, you’ll handle performing actions on each item (on each swipeable card). These are just a few basic examples. In fact, you can use a lot of protocol methods supported by this library as follows: For KolodaViewDataSource:
- func kolodaSpeedThatCardShouldDrag(_ koloda: KolodaView) -> DragSpeed
- func koloda(_ koloda: KolodaView, viewForCardOverlayAt index: Int) -> OverlayView?
There is a side note here, to set the custom overlay action on swiping (left/right), you should override didSet of overlayState property in OverlayView. For KolodaViewDelegate, you can find out in its documentation all the protocols supported by this library. In this iOS tutorial, we would like to mention some of the protocols that we feel are the most important.
func kolodaDidRunOutOfCards(_ koloda: KolodaView)
This function is so noteworthy because you can not leave your UI empty after the view runs out of cards. You have to handle this scenario such as hiding the Koloda or showing a view that’s telling users that there are no more cards. Remember, treating your empty states graciously is a sign of awesome design skills, and makes your mobile app stand out from the crowd.
func koloda(_ koloda: KolodaView, didSelectCardAt index: Int)
This function is called when users tap on a Tinder card (similar to didSelectRowAt of UITableViewDelegate). In our iOS app example, we showed an alert, for example. The rest of the delegate methods refer mostly to animations, so you should carefully research them, to make your dating app richer in visual features. Now, let’s run the app to see our heroes.
Looking for a custom mobile application?
Our team of expert mobile developers can help you build a custom mobile app that meets your specific needs.
Get in TouchConclusion
Alright! We built a simple Tinder UI Card Swipe Swift with KolodaView successfully. In the near future, this behavior will become increasingly common, so we hope you’ll like this article. Download the complete source code here (since we update some UIs to make the UI better and don’t forget to run pod install before opening it up). Don’t forget to share this article if you’ve enjoyed it. Also, if you’re looking to build your own dating app, you can skip a few weeks of design & development, by buying our dating app template. Happy Coding! PS: All images used in this project is downloaded here: https://www.pixelstalk.net/thor-backgrounds-free.