iOS Data Persistence in Swift

In this article, I would like to showcase the basics of iOS data persistence with Swift, by presenting a general overview of what’s possible. Data persistence is the mechanism of storing any type of data to disk so that the same data can be retrieved without being altered when the user opens the app next time. While you could save the same data on a server, in this tutorial we are going to describe all the ways to store data locally in iOS apps.
For example, we are saving to disk all the stocks & cryptocurrencies in your watchlist, for our Finance App Template. We are using NSUserDefaults to persist the users’ settings in all of our templates.
By default, all the variables and constants that you allocate in Swift are stored in memory, so they get lost when users quit the app. Different types of data can be saved to the device locally, using different tools (Swift APIs). To achieve that in Swift that we can use the following technologies (Swift APIs):
- UserDefaults
- Keychain
- Saving files to disk
- Core Data
- SQLite
- Property Lists
Mega Bundle Sale is ON! Get ALL of our React Native codebases at 90% OFF discount 🔥
Get the Mega BundleIn this article, we are going to describe in details these Swift technologies, as well as how to pick the the one that best fits your needs. All of them have powerful benefits, but they come with different trade offs, so it can be tricky to choose the right one, especially if you’re new to iOS.
UserDefaults
UserDefaults as name specific can be used to store default information about the application or its users. For example, the user should be able to specify the default playback speed or currency that you should display when presenting some stock data. These preferences should be application specific and should be persistent between app launches.
UserDefaults is an NSObject subclass that gives us synchronous reads and writes (on cache level) and asynchronous persistence level.
UserDefaults Example
class UserRepository {
    enum Key: String, CaseIterable {
        case name, avatarData
        func make(for userID: String) -> String {
            return self.rawValue + "_" + userID
        }
    }
    let userDefaults: UserDefaults
    // MARK: - Lifecycle
    init(userDefaults: UserDefaults = .standard) {
        self.userDefaults = userDefaults
    }
    // MARK: - API
    func storeInfo(forUserID userID: String, name: String, avatarData: Data) {
        saveValue(forKey: .name, value: name, userID: userID)
        saveValue(forKey: .avatarData, value: avatarData, userID: userID)
    }

    func getUserInfo(forUserID userID: String) -> (name: String?, avatarData: Data?) {
        let name: String? = readValue(forKey: .name, userID: userID)
        let avatarData: Data? = readValue(forKey: .avatarData, userID: userID)
        return (name, avatarData)
    }

    func removeUserInfo(forUserID userID: String) {
        Key
            .allCases
            .map { $0.make(for: userID) }
            .forEach { key in
                userDefaults.removeObject(forKey: key)
        }
    }
    // MARK: - Private
    private func saveValue(forKey key: Key, value: Any, userID: String) {
        userDefaults.set(value, forKey: key.make(for: userID))
    }
    private func readValue<T>(forKey key: Key, userID: String) -> T? {
        return userDefaults.value(forKey: key.make(for: userID)) as? T
    }
}
Advantages
- UserDefaults is easy to use, with a simple API
- Thread safe (you can read and write values from any thread), without worrying about synchronization
- UserDefaults is shared between the app and the app extensions
Limitations
- It is possible to easily override the value for this same key (key collisions)
- UserDefaults is not encrypted
- Unit testing user defaults can occur with some false positives.
- UserDefaults can be altered globally, from anywhere in the app, so you can run in inconsistent states easily
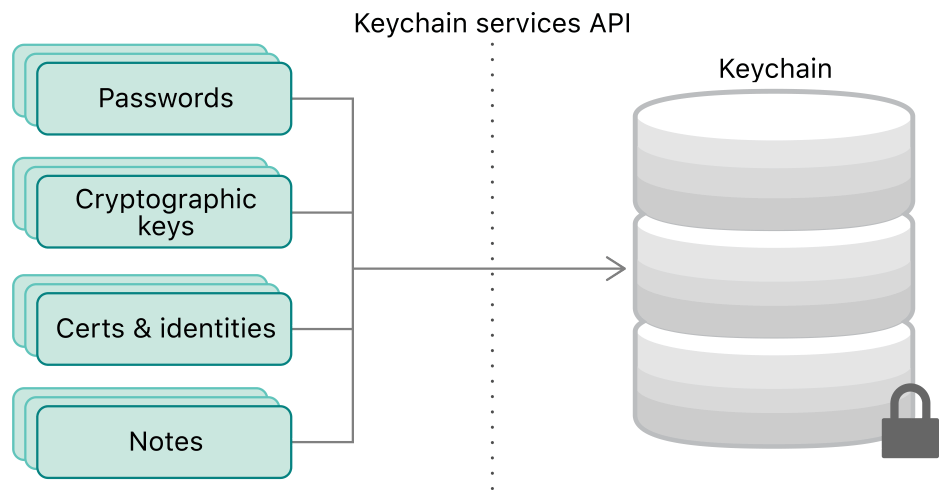
Keychain
Apple Keychain is a very popular and functional Swift tool that every iOS and MacOS user is using. It can be used to save passwords, secure notes, certificates, etc. In general, Keychain is an encrypted database with quite a complicated and robust API.
Use Keychain when you need to save sensitive user data, such as passwords or login credentials. For example, we are using Keychain to implement the persistent login feature in all of our Swift App Templates.
On the following Swift snippet, we can see a simple query that allows reading a password from Keychain for a given account, inside a given service:
struct KeychainItemStorable {
    let service: String
    let account: String
}
extension KeychainItemStorable {
    enum Error: Swift.Error {
        case passwordNotFound
        case unknownError(String)
        case invalidData
    }
    func readPassword() throws -> String {
        var query: [String : Any] = [:]
        query[kSecClass as String] = kSecClassGenericPassword
        query[kSecAttrService as String] = service
        query[kSecAttrAccount as String] = account as AnyObject?
        query[kSecMatchLimit as String] = kSecMatchLimitOne
        query[kSecReturnAttributes as String] = kCFBooleanTrue
        query[kSecReturnData as String] = kCFBooleanTrue

        // Try to fetch the existing keychain item that matches the query.
        var queryResult: AnyObject?
        let status = withUnsafeMutablePointer(to: &queryResult) {
            SecItemCopyMatching(query as CFDictionary, UnsafeMutablePointer($0))
        }
        switch status {
        case noErr:
            guard let items = queryResult as? [String: Any],
                let valueData = items[kSecValueData as String] as? Data,
                let valueString = String(data: valueData, encoding: .utf8) else
            { throw Error.invalidData }
            return valueString
        case errSecItemNotFound:
            throw Error.passwordNotFound
        default:
            throw Error.unknownError(status.description)
        }
    }
}
Saving passwords is even more complicated as the native Keychain API does not distinguish between adding an item and updating an item. Taking into consideration all that stuff, in general, it’s a good idea to use some external libraries with some handy APIs like Locksmith or KeychainAccess for that purpose.
Advantages
- All items saved in keychain are encrypted (Keychain is the most secure data persistence layer in iOS)
- There is a lot of open source wrappers with user-friendly Swift APIs
- Once again security
- Thread safety
Mega Bundle Sale is ON! Get ALL of our React Native codebases at 90% OFF discount 🔥
Get the Mega BundleLimitations
- There is no handy and old-fashioned Keychain API, so you usually end up depending on an open-source project
- Hard to unit test, unless you create your own wrapper around it
- Speed: Reading or saving a lot of information into Keychain can be slow
- Not recommended for storing large objects
CoreData
CoreData is persistence and/or in-memory cache framework that consists of a very powerful set of other tools that can be used within the app. In most common examples CoreData is used as a wrapper for the SQLite database and it’s used to save and present any type of user data.
Functionalities
- Query-free SQL database wrapper
- Easy to read data on the main thread
- Easy to use background thread data saving
- Easy to setup in-memory database (e.g. for caching, or unit testing)
- Out of the box support for automatic migrations of the database between app releases
- Easy to setup database modeling tool (with Interface Builder)
Core Data Example
To setup CoreData in the app, we need to do the following steps:
- Create DataModel object
- Create Entities inside the DataModel tool
- Create CoreData stack
- Fetch NSManagedObjectContext
Let’s create a DataModel. Apple recommends using the application name as DataModel name.

Now, we can create a CoreData stack. The stack should store NSPersistentContainer, and give access to mainContext (which is a NSManagedObjectContext object) – this one should be used for fetching the data and to create background contexts which are responsible for saving the data.
class CoreDataManager {
    static let shared = CoreDataManager()
    private init() {}
    private lazy var persistentContainer: NSPersistentContainer = {
        let container = NSPersistentContainer(name: "PillReminder")
        container.loadPersistentStores(completionHandler: { _, error in
            _ = error.map { fatalError("Unresolved error \($0)") }
        })
        return container
    }()

    var mainContext: NSManagedObjectContext {
        return persistentContainer.viewContext
    }

    func backgroundContext() -> NSManagedObjectContext {
        return persistentContainer.newBackgroundContext()
    }
}
Mega Bundle Sale is ON! Get ALL of our React Native codebases at 90% OFF discount 🔥
Get the Mega BundleLoading an array of pills:
func loadPills() -> [Pill] {
    let mainContext = CoreDataManager.shared.mainContext
    let fetchRequest: NSFetchRequest<Pill> = Pill.fetchRequest()
    do {
        let results = try mainContext.fetch(fetchRequest)
        return results
    }
    catch {
        debugPrint(error)
    }
}
To save a new Pill entity, we need to perform the following steps:
func savePill(name: String) throws {
    let context = CoreDataManager.shared.backgroundContext()
    context.perform {
        let entity = Pill.entity()
        let pill = Pill(entity: entity, insertInto: context)
        pill.name = name
        pill.amount = 2
        pill.dozePerDay = 1
        pill.lastUpdate = Date()
        try context.save()
    }
}
- context.perform is a requirement for being thread-safe because all operations of the given context need to be performed on the context queue.
- let entity = Pill.entity() is creating the entity, which is required to create an empty database row
- Then we can create a Pill object Pill(entity: entity, insertInto: context)
- last, but not least, try context.save is saving the context and informing other contexts that database changes were performed
Core Data Advantages
- CoreData is simple to set up and use
- Lots of additional tools provided by Apple for fetching data (https://developer.apple.com/documentation/coredata/nsfetchedresultscontroller)
- Speed & Performance: Possibility to be a cache when setup
in memory - Out-of-the-box database migrations (simple one)
Core Data Limitations
- Quite advanced threading policy
- Being forced to use NSManagedObject subclasses for every new object in the database
- Sometimes NSManagedObjectContext have problems with synchronizing database changes
Saving Files to Disk
Apple makes writing, reading, and editing files inside the iOS applications very easy. Every application has a sandbox directory (called Document directory) where you can store your files. FileManager object provides all these functionalities with very simple APIs.
Files can be stored inside catalogs and sub-catalogs of your app’s Document directory. That’s why Apple recommends using the URL to specify and work with files using the FileManager object.
URL classes, in general, are used when working with a network like API requests and opening the websites. This use cases require adding https:// prefix for every URL to be created. For files, Apple requires using the “file://” prefix, which allows Apple to detect whether you are using the proper file URL.
How to Save Data to Disk in Swift
Let’s decompose a simple example in which we would like to save Data to a file on disk.
class FilesManager {
    enum Error: Swift.Error {
        case fileAlreadyExists
        case invalidDirectory
        case writtingFailed
    }
    let fileManager: FileManager
    init(fileManager: FileManager = .default) {
        self.fileManager = fileManager
    }
    func save(fileNamed: String, data: Data) throws {
        guard let url = makeURL(forFileNamed: fileNamed) else {
            throw Error.invalidDirectory
        }
        if fileManager.fileExists(atPath: url.absoluteString) {
            throw Error.fileAlreadyExists
        }
        do {
            try data.write(to: url)
        } catch {
            debugPrint(error)
            throw Error.writtingFailed
        }
    }
    private func makeURL(forFileNamed fileName: String) -> URL? {
        guard let url = fileManager.urls(for: .documentDirectory, in: .userDomainMask).first else {
            return nil
        }
        return url.appendingPathComponent(fileName)
    }

}
func makeURL(forFileNamed fileName: String) -> URL?
The method is responsible for creating the URL of the file with the given name. As mentioned, we can only write to the documents directory with .userDomainMask.
fileManager.fileExists(atPath: url.absoluteString) returns true if the file already exists. We probably would like to not override that file, but this depends on your use case.
Now that we are sure we can save the file, we should use a Data object method write(to url: URL, options: Data.WritingOptions) throws that stores the file under specified URL.
Mega Bundle Sale is ON! Get ALL of our React Native codebases at 90% OFF discount 🔥
Get the Mega BundleReading a file in Swift is simple as a charm:
func read(fileNamed: String) throws -> Data {
       guard let url = makeURL(forFileNamed: fileNamed) else {
           throw Error.invalidDirectory
       }
       guard fileManager.fileExists(atPath: url.absoluteString) else {
           throw Error.fileNotExists
       }
       do {
           return try Data(contentsOf: url)
       } catch {
           debugPrint(error)
           throw Error.readingFailed
       }
   }
Advantages
- FileManager can be used with iCloud storage, so our app data is synchronized between all iOS and MacOS user devices
- FileManager is thread-safe
- FileManager can be used in many other ways, like listing directory contents, creating directories, moving, copying or removing files
- You can store large objects (e.g. photos) to disk, as long as there is enough local storage on the device.
Limitations
- Creating URL paths can be error-prone
- You cannot store the absolute URL of the given file, as the sandbox of the application can be moved
- Speed penalty: Reading/saving files from disk can be very slow
SQLite
SQLite is a relational database management system contained in a C programming library. In contrast to many other database management systems, SQLite is not a client-server database engine. In fact, it is embedded in the client application itself. So there is no networking involved in SQLite.
The most common purpose of using SQLite in the app is a possibility to make some data read/write optimizations on the database level, which cannot be done using CoreData. This topic is very wide, so I would like to encourage you to get familiar with the following wrapper for SQLite: https://github.com/groue/GRDB.swift.
Property list (Plists) in Swift
Plist files enable storing serialized objects with key/value conventions. In macOS and iOS applications, the most common usage example of plist is an Info.plist file which stores application settings values. Inside Info.plist we can find the application name, bundle identifier, version number, required permissions info, Facebook App info, etc. Another example of a .plist file, implemented in all of our iOS App Templates that use Firebase, is the GoogleService-Info.plist file, that contains all the Firebase API Keys, needed for user authentication & database access.
In plist files you can store small primitive objects, such as:
- Strings
- Numbers (Int, Floats)
- Bools
- Dates (ISO 8601 formatted string)
- Data (NSData, for Objective-C folks)
- Arrays
- Dictionaries
Information stored inside the application’s Info.plist file can be read using the Bundle.main.infoDictionary with subscript access. Fetching the bundle identifier is simple as:
let bundleIdentifire = Bundle.main.infoDictionary[kCFBundleIdentifierKey] as? String
In the following example, I would like to show how to create and read a custom plist file using Swift. Let’s add to our application source code, this plist file
<?xml version="1.0" encoding="UTF-8"?>
<!DOCTYPE plist PUBLIC "-//Apple//DTD PLIST 1.0//EN" "http://www.apple.com/DTDs/PropertyList-1.0.dtd">
<plist version="1.0">
<dict>
  <key>FirstName</key>
  <string>John</string>
  <key>SecondName</key>
  <string>Doe</string>
  <key>Age</key>
  <string>24</string>
</dict>
</plist>
Mega Bundle Sale is ON! Get ALL of our React Native codebases at 90% OFF discount 🔥
Get the Mega BundleAnd let's create a simple PlistReader object class:
class PlistReader {
    func read(fileNamed: String) throws -> [String: Any] {
        guard let path = bundle.path(forResource: fileNamed, ofType: "plist"),
            let plistData = FileManager.default.contents(atPath: path) else {
                throw Error.fileMissing
        }
        var format = PropertyListSerialization.PropertyListFormat.xml
        return try PropertyListSerialization.propertyList(from: plistData,
                                                          options: .mutableContainersAndLeaves,
                                                          format: &format) as! [String: Any]
    }
}
Printing the result gives us:
`["FirstName": John, "SecondName": Doe, "Age": 24]`
Easy, right?
Plist Advantages
- Plist files are very easy to read both for humans and computers
- Plist files can be used to specify some app environment values, like base backend URL, application keys, shared regex strings. They are a better fit for this, than let’s say, Swift classes.
Limitations
- Working with String keys can be error-prone
- It’s easy to break plist files with some unclosed
</>key or value input - You can only store small objects of primitive types
Looking for a custom mobile application?
Our team of expert mobile developers can help you build a custom mobile app that meets your specific needs.
Get in TouchiOS Data Persistence Final Words
Thank you for reading this article. I hope that you learned something new here. These are all of the iOS Data Persistence APIs in Swift. They all come with benefits and limitations, so make sure you choose the one that is the most appropriate for your use case. In all of our iOS App Templates, we are leveraging multiple local data persistence techniques, to achieve high-performance thresholds and great security for sensitive data.
Feel free to let us know what was your experience with these different types of data persistence layers in iOS apps. And don’t forget to share this article. Happy Coding!